Deploy a Database Project DacPac using OctopusDeploy and PowerShell
In the past, I’ve had to write numerous collections of PowerShell scripts to deploy websites to various development servers. Octopus Deploy takes the pain out of that by providing a slick interface that lets you easily set up environments and get your code out to them.
One thing that it doesn’t handle out of the box is Database Projects. But it is possible.
Create the Package
Octopus packages are just NuGet packages. And the tool to create them is another NuGet package. All you need to do is add the OctoPack package to your project and then set the build parameter /p:RunOctoPack=true and your package will be created.
At the moment, this package isn’t compatible with Database Projects so you’ll need to go through a couple of manual steps to reference it.
Download the Package
If you’re already using OctoPack in one of the other projects in your solution (such as your website), then you’ll already have it. If not, pull down the latest OctoPack to your packages folder using the Package Manager Console:
Install-Package OctoPackReference it in your project
Right-click on your Database Project in Visual Studio and select “unload project”. Once that’s unloaded, right-click again and select “edit Database.sqlproj” (or the equivalent for whatever your project is called).
You’ll need to add in a few lines to reference OctoPack in there, so scroll to the bottom and enter the following just before the final </Project> tag:
<Import Project="..packagesOctoPack.3.0.41toolsOctoPack.targets" Condition="Exists('..packagesOctoPack.3.0.41toolsOctoPack.targets')" />
<Target Name="EnsureOctoPackImported" BeforeTargets="BeforeBuild" Condition="'$(OctoPackImported)' == ''">
    <Error Condition="!Exists('..packagesOctoPack.3.0.41toolsOctoPack.targets') And ('$(RunOctoPack)' != '' And $(RunOctoPack))" Text="You are trying to build with OctoPack, but the NuGet targets file that OctoPack depends on is not available on this computer. This is probably because the OctoPack package has not been committed to source control, or NuGet Package Restore is not enabled. Please enable NuGet Package Restore to download them. For more information, see http://go.microsoft.com/fwlink/?LinkID=317567." HelpKeyword="BCLBUILD2001" />
    <Error Condition="Exists('..packagesOctoPack.3.0.41toolsOctoPack.targets') And ('$(RunOctoPack)' != '' And $(RunOctoPack))" Text="OctoPack cannot be run because NuGet packages were restored prior to the build running, and the targets file was unavailable when the build started. Please build the project again to include these packages in the build. You may also need to make sure that your build server does not delete packages prior to each build. For more information, see http://go.microsoft.com/fwlink/?LinkID=317568." HelpKeyword="BCLBUILD2002" />
</Target>
You’ll need to change the version number (3.0.41 above) to match the version that you’ve downloaded.
Once done, you can save and reload your project (right-click on the project file and select “Reload Project”).
Create the Publish Commands
The output of the Database Project is a DacPac file. We can run a deployment on this file using Microsoft.SqlServer.Dac.DacServices but we need something to trigger this build.
Octopus will run any PowerShell script found in the top level of the NuGet package. So, we’ll create a Deploy.ps1 file here and script our deployment inside of that.
This is what our file will look like:
# Set params
if (! $dbName)
{
    Write-Host "Missing required variable dbName" -ForegroundColor Yellow
    exit 1
}
if (! $dbPublishProfile)
{
    Write-Host "Missing required variable dbPublishProfile" -ForegroundColor Yellow
    exit 1
}
if (! $dbUser)
{
    Write-Host "Missing required variable dbUser" -ForegroundColor Yellow
    exit 1
}
if (! $dbPassword)
{
    Write-Host "Missing required variable dbPassword" -ForegroundColor Yellow
    exit 1
}

# Add the DLL
# For 64-bit machines
Add-Type -path "${Env:ProgramFiles(x86)}Microsoft SQL Server110DACbinMicrosoft.SqlServer.Dac.dll"

# Create the connection string
$d = New-Object Microsoft.SqlServer.Dac.DacServices ("data source=(local);User Id = " + $dbUser + ";pwd=" + $dbPassword)

#Load the dacpac
$dacpac = (Get-Location).Path + "ContentDatabase.dacpac"
$dacpacoptions = (Get-Location).Path + "Content" +  $dbPublishProfile + ".publish.xml"

Write-Host $dacpac
Write-Host $dacpacoptions

#Load dacpac from file & deploy to database
$dp = [Microsoft.SqlServer.Dac.DacPackage]::Load($dacpac)

#Read a publish profile XML to get the deployment options
$dacProfile = [Microsoft.SqlServer.Dac.DacProfile]::Load($dacpacoptions)

# Deploy the dacpac
$d.Deploy($dp, $dbName, $true, $dacProfile.DeployOptions)
On lines 1-21, we’re just checking for the parameters we’ll need to pass into the script when deploying the database:
- $dbName: the name of the database to targets
- $dbPublishProfile: the publish profile to use when deploying
- $dbUser: the database user to use
- $dbPassword: the password for the user being used
We can then add the Dac DLL reference to make the tools available.
Add-Type -path "${Env:ProgramFiles(x86)}Microsoft SQL Server110DACbinMicrosoft.SqlServer.Dac.dll"Our deployment is going to be run directly on the target machine, so we can pull in DacServices using the local machine as our connection, giving it the DB user and password.
$d = New-Object Microsoft.SqlServer.Dac.DacServices ("data source=(local);User Id = " + $dbUser + ";pwd=" + $dbPassword)The next few lines set up some paths and output these to the logs for debugging:
$dacpac = (Get-Location).Path + "ContentDatabase.dacpac"
$dacpacoptions = (Get-Location).Path + "Content" +  $dbPublishProfile + ".publish.xml"

Write-Host $dacpac
Write-Host $dacpacoptions
Now we’re ready to load our DACPAC file…
$dp = [Microsoft.SqlServer.Dac.DacPackage]::Load($dacpac)…and the profile file…
$dacProfile = [Microsoft.SqlServer.Dac.DacProfile]::Load($dacpacoptions)…and use the services to deploy them:
$d.Deploy($dp, $dbName, $true, $dacProfile.DeployOptions)Although our profile will already have a DB name specified in it, specifying it as a separate variable to pass in during deployment allows the same profile to be used for multiple targets.
Include the Script
We need to add this script, the DACPAC, and the profile file to our Octopus Deploy package. Since this is just a NuGet package, we can create a NuSpec file to specify what should be included.
Our Database.nuspec file looks like this:
<?xml version="1.0" encoding="utf-8" ?>
<package xmlns="http://schemas.microsoft.com/packaging/2010/07/nuspec.xsd">
  <metadata>
    <id>Database</id>
    <version>1.0.0.0</version>
    <authors>Kevin Wilson</authors>
    <description>NuGet package for DB</description>
  </metadata>
  <files>
    <file src="binReleaseDatabase.dacpac" target="Content" />
    <file src="Dev.publish.xml" target="Content" />
    <file src="Deploy.ps1" />
  </files>
</package>
We don’t set a target for the Deploy.ps1 file (line 12) so that it will sit in the top level of our package and be run by Octopus.
Now that’s in place, we can build our project and create our OctoPack file ready for deployment.
Set Up the Environment
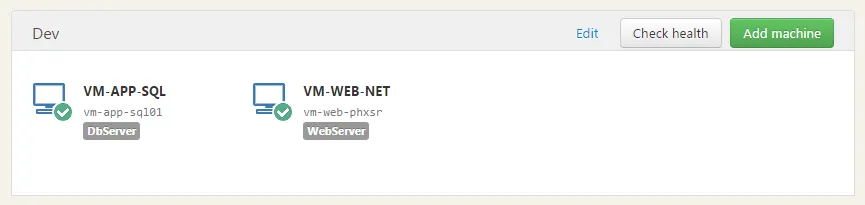
We’ll be running the database deployment directly on the target machine, so we’ll need to install a Tentacle instance on there. If you’re already using Octopus for deployment, you’ll be familiar with this process. Or, you can go and refresh your memory using the Octopus Deploy docs.
Once created, we can add our target machine into our environment and tag it as a DB Server.
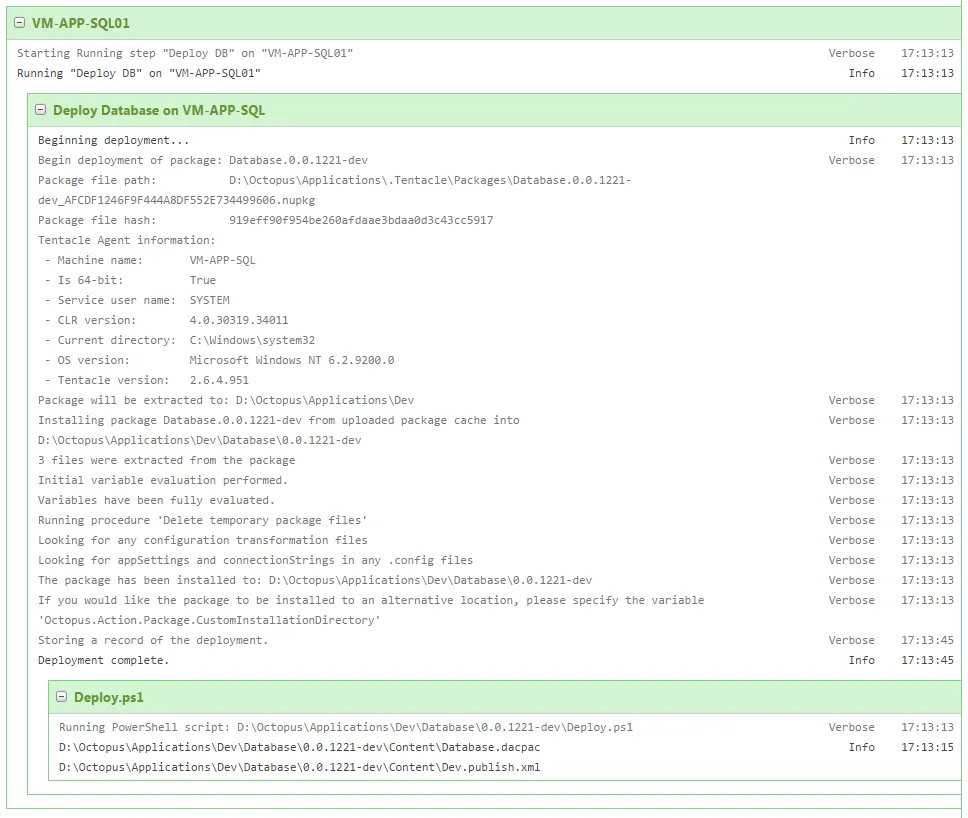
Now we’re ready to deploy our database.
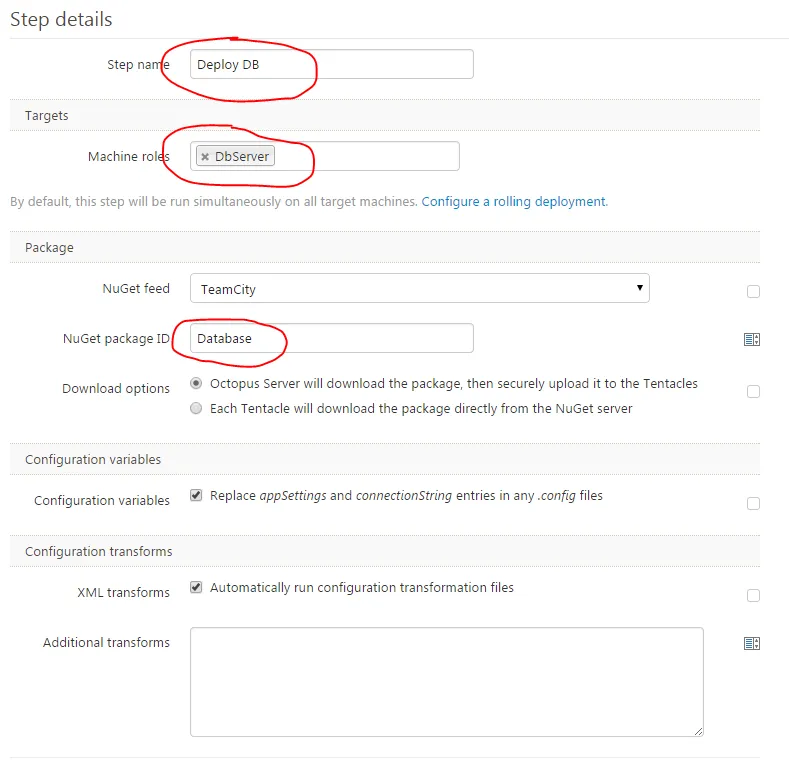
Deploy the Package
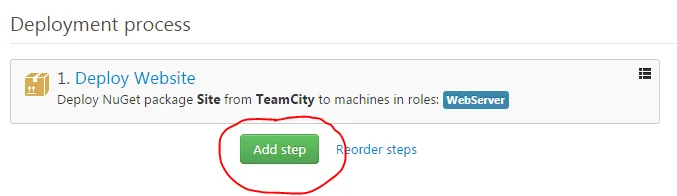
First, we’ll go into our Octopus Deployment Process for our project and select “Add Step“.
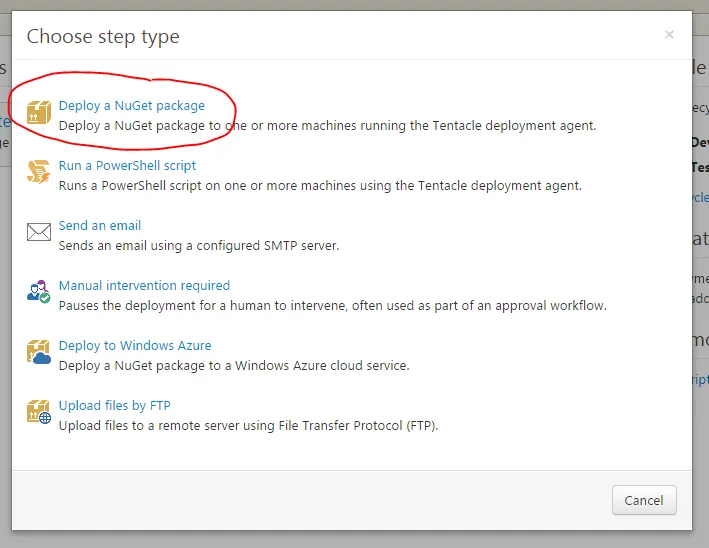
Then we’ll select “Deploy a NuGet package” as our step type.
Lastly, we’ll enter the details of our step name and package details (in this example, I’m pulling the package from a TeamCity feed).
Parameters
Our Deploy.ps1 file requires 4 parameters to run:
- $dbName
- $dbPublishProfile
- $dbUser
- $dbPassword
We can provide these using Octopus’ Variables section in our project.
One of the best features of Octopus Deploy is the ability to set up different values for the same build parameter dependent on the environment or build step currently running.
We’ll set ours up for Dev and our Deploy DB step.

And now, when we run our deployment, our database will be pushed along with the code.